 Nitromule
Connect WooCommerce to Nitromule
Updated 2026-09-07
On this page
Connect your WooCommerce store so Nitromule can import orders, create labels, push tracking back to buyers, optionally sync inventory, and show live UPS, USPS, and FedEx rates at checkout (United States).
WooCommerce integration requirements
Before you connect:
- A Nitromule account on a plan that includes store connections (Business)
- WordPress with WooCommerce installed and active (self-hosted or a host that allows plugins)
- Admin access to WordPress
- A public HTTPS store URL (Nitromule calls your site directly — there is no WordPress.com Jetpack proxy)
- A default ship-from address in Nitromule
Classic WordPress.com blogs that cannot install plugins are not supported. Atomic / self-hosted WordPress with plugin install works when HTTPS to /wp-json/ is reachable.
Connect a WooCommerce store to Nitromule
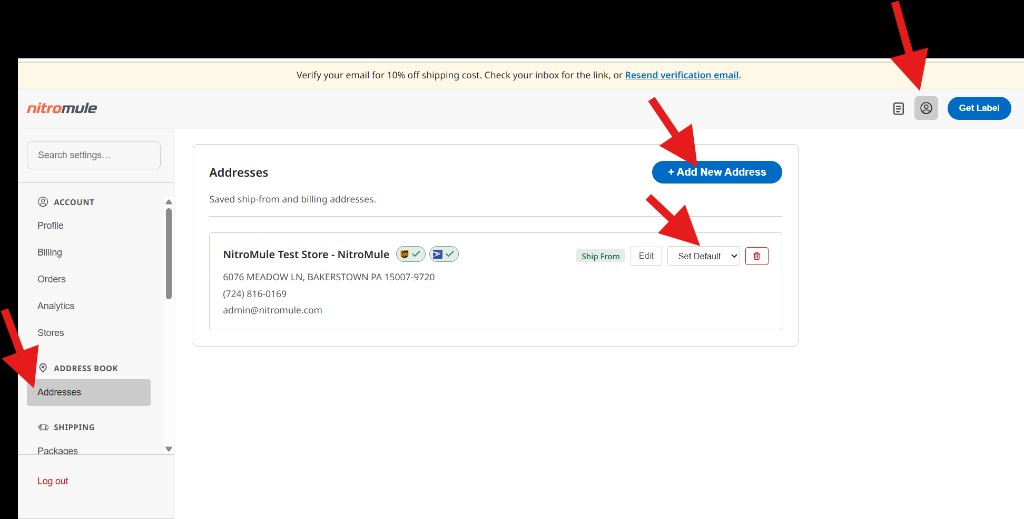
1. Set your ship-from address in Nitromule
Do this in Nitromule, not in WordPress. Rates and labels need a default ship-from.
- Sign in at nitromule.com.
- Open your account (profile icon, top right).
- Under Address Book, open Addresses.
- Select + Add New Address and enter the location you ship packages from.
- On that address, open Set default and choose Ship From.
- Optionally set a default billing address.
2. Install the plugin
- In WordPress, go to Plugins → Add New.
- Search for Nitromule for WooCommerce, or install from the WordPress.org plugin directory.
- Activate Nitromule for WooCommerce.
WooCommerce must already be installed and active.
3. Choose which orders to import
- Go to WooCommerce → Settings → Integration → Nitromule.
- Under Export Order Statuses, select the Woo statuses Nitromule may pull (defaults include Processing and On-hold).
- Save changes.
Unlabeled imports land in Incomplete in Nitromule. Cancelled or refunded Woo orders map to Voided/Refunded. Orders move to Shipment Ready after you Place Order for a label in Nitromule — not from Woo status mapping alone.
4. Generate credentials
- On the same Nitromule integration page, open Credentials.
- Select Generate REST API keys.
- Copy all four values:
- Consumer Key (
ck_…) - Consumer Secret (
cs_…) - Authentication Key
- Store URL
The Consumer Key is shown only once. If you lose it, generate new keys and update the connection in Nitromule. The Authentication Key is separate from the Consumer Key and Secret — paste each into the matching field.
5. Connect in Nitromule
- In Nitromule, open Stores → WooCommerce.
- Paste the four values into the matching fields.
- Optionally enable Synchronize inventory with WooCommerce and Enable checkout rates.
- Select Connect store.
- Select Sync orders now to pull orders into Incomplete.
Available features for WooCommerce
| Feature | What it does |
|---|---|
| Order import | Pulls physical, shippable orders by Export Order Statuses |
| Background sync | Server-side sync on an interval (you do not need the Orders tab open) |
| Multi-store | Multiple Woo stores per Nitromule account |
| Ship-notify | After you Place Order, tracking, carrier, service, and fee push to Woo |
| Checkout Rates | Live UPS/USPS/FedEx rates at checkout (US stores) |
| Inventory sync | Optional on-hand / available quantity sync for linked products |
| Notes & gifts | Buyer notes, gift flags, and common line-item fields |
Day-to-day workflow
- New Woo orders appear in the orders dashboard (Incomplete until labeled).
- Open an order, get rates, and Create Label.
- Nitromule notifies Woo with tracking; the order moves toward Shipment Ready in Nitromule and Completed in Woo when ship-notify succeeds.
- Use download / void from the Nitromule order if you need the PDF again — do not Place Order a second time for a copy.
Store settings in Nitromule
On the WooCommerce store card you can:
- Re-test the connection and rotate credentials (after regenerating in WordPress)
- Toggle Enable checkout rates (configures the Nitromule Rates shipping method)
- Toggle Synchronize inventory with WooCommerce
- Select Sync orders now
- Disconnect store
For checkout-rate setup details (US selling locations and shipping zones), see Live checkout rates for WooCommerce.
Integration notes
- Only line items that require shipping are the focus; digital-only products are skipped.
- Requested service from Checkout Rates imports onto the Nitromule order when the customer chooses a Nitromule rate at checkout.
- Permalinks in WordPress must not be Plain — otherwise
/wp-json/nitromule/v1/breaks and looks like a network error. - Nitromule connects directly to your store over HTTPS. Allowlist
/wp-json/nitromule/v1/(and/wp-json/wc/if used) on firewalls / WAFs.
Troubleshooting tips
- Authentication failed — re-copy all keys from Credentials. If the Consumer Key was lost, generate new keys.
- Could not find / reach the store — Store URL must use
https://and match Credentials. - Network / could not reach on a public HTTPS site — Settings → Permalinks → anything other than Plain → Save. Quick check: open
https://your-store/wp-json/— you should see JSON, not the shop homepage. - Plugin API not found — plugin activated? Host allows plugins?
- Firewall / WAF — allowlist HTTPS to the Nitromule REST routes.
- SSL errors — fix the site certificate, then Test Connection again.
- No rates at checkout — see checkout rates and troubleshoot WooCommerce.
Still stuck after Test Connection? Re-copy credentials, confirm the site is publicly reachable over HTTPS, and work through Troubleshoot your WooCommerce connection.